How to Add a New Eclipse Project to an SVN Repository
Contents
Introduction
Any serious development effort requires some type of version control software such as Subversion (SVN). Eclipse has excellent SVN support through the Subclipse plugin. In this document we will see how a new Eclipse project can be checked into an SVN repository, and give some tips for organizing your repository.
If you are to learn one thing from this guide it is that you should think carefully about commiting IDE-specific files.
Installing Subclipse
First we install the Subclipse plugin into Eclipse to enable SVN support. This plugin includes the Subversion client, and integrates SVN into the Eclipse interface.
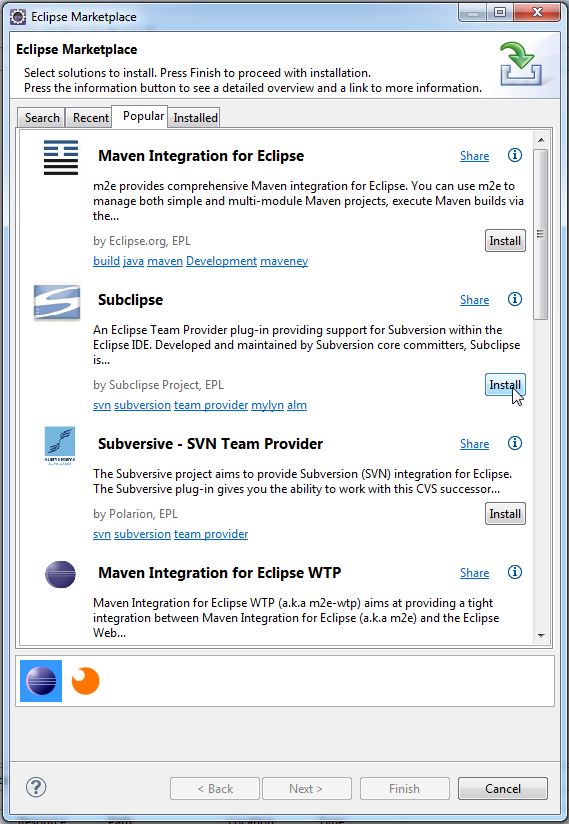
1) Open the Eclipse Marketplace through Help -> Eclipse Marketplace.
2) Search for Subclipse, and click Install.
3) Select all available Subclipse modules for installation, and accept the license agreement. Choose to restart Eclipse when prompted.
Connecting to Your Repository
With Subclipse installed we can now connect to an SVN repository, check out code, commit changes, and more of that good stuff. Subclipse provides several new views that will help us with these SVN tasks.
1) Go to Windows -> Views -> Other to open a list of all available views. Notice that there is a new “SVN” category. Open the SVN Repositories view from the SVN category.

2) Right-click in the SVN Repositories view, and select New -> Repository Location.

3) Enter the URL of your repository and click Finish.

Note that SVN supports multiple protocols for repository access, so the URL can have a http://, https:// or svn:// prefix. It’s a good idea to set up your SVN server to allow only https, since it is the most secure.
4) Now the repository should be available in the SVN Repositories view, and you can browse its contents. Our repository uses the standard organization with three top-level directories.

Uploading a New Project to the Repository
We have a project SimpleProject that we want to add to the repository.
1) Right-click the project and select Team -> Share Project.

2) Select SVN as the repository type.

3) Select the repository this project should be stored in.

4) Select the repository directory where the project should be stored, and click Finish.
The files in a repository are usually organized by project. A common convention is to store each project in a separate subdirectory of the /trunk directory in the repository. We will follow that convention, so the target location of SimpleProject is /trunk/SimpleProject.

5) Now the /trunk/SimpleProject directory is created in the repository, and the project is associated with this repository location in Eclipse. You can now commit (upload) your changes by right-clicking and selecting Team -> Commit.

Ignoring Files
When committing our simple project we see several Eclipse-specific files:

It is good practice to be conservative with uploading IDE-specific files to the repository. You have to think carefully about which files to check in. Using the svn:ignore property we can prevent files from being committed.
A common approach is to check in the .classpath and .project files, and to decide about files in the .settings on a per-file basis. For this example, however, we will use svn:ignore property to simply make all Eclipse files invisible to SVN.
1) Right-click your project and select Team -> Show Properties.

2) Right-click in the SVN Properties view and select Add a property.

3) Enter svn:ignore as the property name, and enter the names of the files you want to exclude from SVN. For this example we enter .project, .classpath and .settings. Click OK.

4) Commit your project using Team -> Commit. The IDE-specific files are no longer listed, so we can safely commit the rest of the project!

Two things are important to know:
- Properties in SVN are attributes of directories.
- Properties can be committed and checked out.
The property we just created is committed to the repository as an attribute of the /trunk/SimpleProject directory. If someone does a checkout of this project (I will show you how), it will automatically have the correct svn:ignore property.
A fast way of adding files to the svn:ignore property is by right-clicking and selecting Team -> Add to svn:ignore… This is only possible if the file is not in the repository yet–the option is greyed out otherwise. In that case you should first delete the file from the repository through the SVN Repositories view.
Checking Out a Project From the Repository
The downside of not storing IDE-specific files is that you need to do some extra work to start working on a project from the repository. Non-default settings, e.g. library classpaths, have to be configured manually after checking out the project.
When your projects start growing big, with lots of dependencies, you should really consider using a build tool such as Maven. You can safely store Maven’s pom.xml in the repository.
To check out a simple project from an SVN repository you can simple do this:
1) Go to SVN Repositories view and right-click the project directory. Select Checkout.

2) Select the option to check out using the New Project Wizard.

3) Select the type of project you want to create, in this case it is just a Java Project.

4) Configure the Java Project and click Finish.

Now finish setting up the project by adding any included the .jar files to your build path, and you should be good to go.


